Programming HealthyPi v4
Programming with Arduino
Step 1: Download and Install the IDE
The Arduino Software (IDE) allows you to write programs and upload them to your HealthyPi v4. You can download the latest version for Windows, Linux and Mac OS using the below link. Download the Arduino IDE
Note: Once you have downloaded, install the IDE and ensure that you enable most (if not all) of the options, including the drivers. Click for installing instructions in windows, linux, Mac OS
Step 2: Get the HealthyPi v4 COM Port Number
Next, you will need to connect the HealthyPi v4 board to a system. This is done via a USB connection. When the HealthyPi v4 is connected, the operating system should recognize the board as a generic USB COM port. The easiest way to do this is to type Device manager into Windows Search and select Device Manager when it shows.
In the Device Manager window, look for a device under Ports (COM & LPT) and chances are the HealthyPi v4 or an Arduino will be the only device on the list.
Step 3: Configure Arduino for ESP32 board support
The Arduino IDE does not come with support for ESP32 out of the box. Please follow the following instructions to add ESP32 boards support to the Arduino IDE.
Installing ESP32 Platform in Boards Manager
You will also need to select the “ESP32 Dev Module” board using the “Board:” option menu as shown in the figure below:
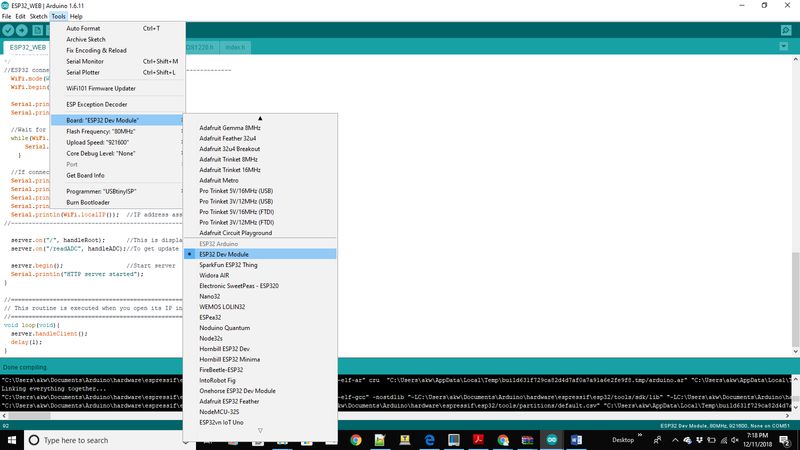
Also, select the following options for the selected board by
- Partition Scheme -> Minimal SPIFFS (1.9MB App with OTA/190Kb SPIFFS)
Next, you must tell the IDE which COM port the HealthyPi v4 is on. To do this, navigate to Tools > Port > COMXX. Obviously, if your HealthyPi v4 is on a different port, select that port instead.
Step 4: Install the latest HealthyPi v4 Arduino libraries
Download the latest Arduino Library for HealthyPi v4 from the link below.
Download HealthyPi v4 Arduino Library
Rename the downloaded file to “healthypiv4.zip” and upload it to the Arduino IDE by going to Sketch -> Include Library -> Add .ZIP library and then select the healthypiv4.zip file. The library should now be installed.
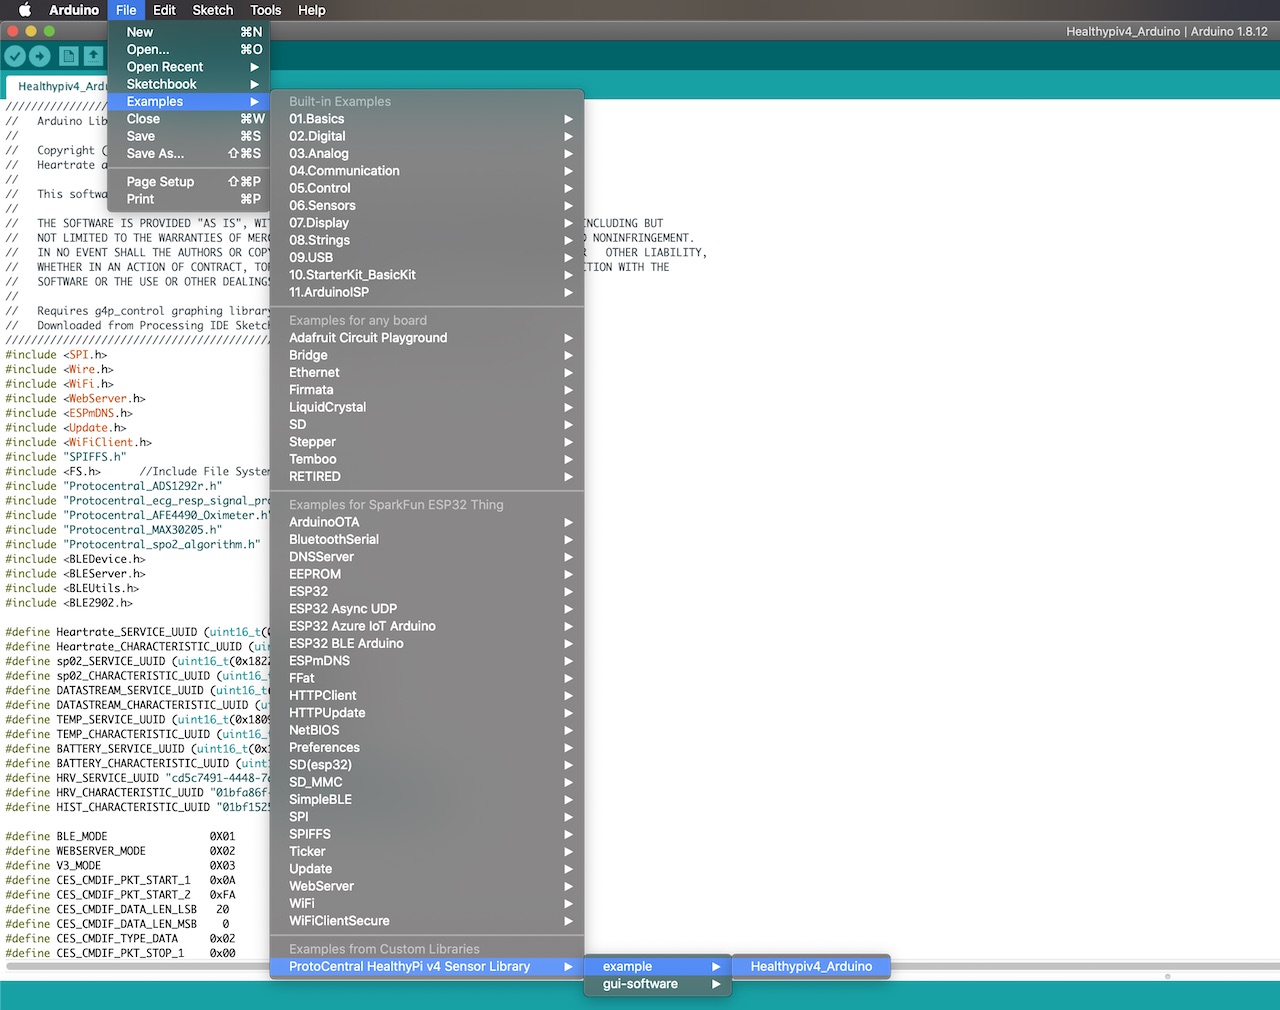
Once installed, restart the Arduino IDE to load these libraries. You can now load the main HealthyPi Arduino sketch as shown below from File -> Examples -> “ProtoCentral HealthyPi v4 Sensor Library” -> examples -> “Healthypiv4_Arduino”
Step 5: Install the Arduino ESP32 Filesystem(SPIFFS)
The HealthyPi v4 code requires an Arduino tool plugin called the “ESP32 File system uploader” to upload the SPIFFS filesystem. Check this site for direction to download and install the ESP32FS plugin.
Restart the Arduino IDE for the this tool to show in the Tools menu. Once
Navigate to Tools->ESP32 Sketch Data Upload and it will upload the SPIFFS File.
Note: Ensure that the data folder containing all of the SPIFFS file is in the same folder as the location of the sketch file that is currently open.
Step 6: Uploading code to HealthyPi v4
Compile the code and check for compilation without error and upload the code to HealthyPi v4 and see the output in the mode of your choice.
You’re now all set to modify and/or write your own code for the HealthyPi v4 !!
Some Example code:
Initializing the functionalities in HealthyPi v4
void setup()
{
  Serial.begin(115200);

  if(Healthypi_Mode == WEBSERVER_MODE){
    Serial.println("Starts in webserver mode");
    HealthyPiV4_Webserver_Init();
  }

  else if(Healthypi_Mode == V3_MODE){
  Serial.println("Starts in v3 mode");
  }

  else{
  Serial.println("Starts in BLE mode");
  HealthyPiV4_BLE_Init();
  }

 }
In the loop function below we read the vitals data from HealthyPi v4 .
void loop()
{

  Heart Rate = (uint8_t) global_HeartRate;
  Respiration Rate = (uint8_t) global_RespirationRate;
  spo2 = (uint8_t)afe44xx_raw_data.spo2;
  temperature =  (uint16_t) tempSensor.getTemperature();

}
Programming with ESP IDF
In some cases where you need maximum performance, improved compatibility, and low overhead, you might want to use the native SDK. ESP-IDF is Espressif’s official development SDK for the on-board ESP32-WROOM32 module. ESP-IDF also helps you understand what is happening under the hood. Through a simple step-by-step process to illustrate how to use ESP-IDF(Espressif IoT Development Framework).
What You Need?
To develop applications for ESP32 you need:
- PC loaded with either Windows, Linux or Mac operating system
- Toolchain to build the Application for ESP32
- ESP-IDF that essentially contains API for ESP32 and scripts to operate the Toolchain
- A text editor to write programs (Projects) in C
Preparation for development
There are three simple steps in the process of development:
- Setup of Toolchain
- Getting of ESP-IDF from GitHub
- Installation and configuration
Step 1: Setting up the toolchain
Windows don’t have a built-in “make” environment, so as well as installing the toolchain you will need a GNU-compatible environment. We can use the MSYS2 environment to provide this environment. The quick setup is to download the Windows all-in-one toolchain & MSYS2 zip file from dl.espressif.com: Toolchain Setup- Windows
The quick setup is to download the linux all-in-one toolchain from Espressif website:Toolchain Setup 64-bit Linux and Toolchain Setup 32-bit Linux
The quick setup is to download the ESP32 toolchain for macOS all-in-one toolchain from Espressif website:Toolchain Setup macOS
Step 2: Getting ESP-IDF
Besides the toolchain (that contains programs to compile and build the application), you also need ESP32 specific API / libraries. They are provided by Espressif in ESP-IDF repository. To get it, open terminal, navigate to the directory you want to put ESP-IDF and clone it from espressif repository in github.
Step 3: Setting up
To set up the software environment and get esp-idf follow the instructions by clicking Windows, Linux, Mac OS.